Pages

Wednesday, April 27, 2016

Altered gift card holder with Irit


Hello my dear crafty friends and welcome to our blog!
 This is Irit and I made a tutorial for you that is all altered and party Mixed Media
As much as I was tempted to make an art journal page, I moved from my comfort zone and decided to make something useful. So say Hello to my Gift card holder made from  chipboard, cardstock, collage sheets and a lot of Mixed Media products.
Here how it looks when closed and I made it flat in purpose. You can add whatever flowers and extras on the cover if you wish, but I like it flat so it can be sent in an envelope.


Step by step instructions:
1. Cut white 12*12'' chipboard or thick cardstock into two even parts of 12*6''.
Score and fold the first one as shown on 3''-6''-3'' - this is the inner part of the holder.
Score and fold the second half to 2 1/2''- 1/2''- 4 1/2''- 1/2''- 4 1/2''.


2. Cut Kaisercraft patterned cardstock to fit  cover  in one piece and  cut other pieces to fit the " pages" with like 1/8'' less from each side.
3. Use Tim Holtz Gothic stencil and DecoArt Crackle paste  over the cover cardstock. Let it dry and be sure you see crackles before you continue with this piece.


 4.Make the " postcard" with Joggles Quirky Houses collage sheet. Cut  5 houses and arrange them over the patterned cardstock (light wood side). Glue them with Gel Medium and let it dry.

5. Color the Quirky houses with a mix of Ranger Distress markers. Cover  each colored house with Glossy Accents and let it dry. Do not cover the free spaces over the cardstock as we want them to absorb mists and paints later.


6. Use Travel stencil with DecoArt Modelling paste over three cardstock pieces that were cut for the horizontal inside pages. Let the paste dry.


7. Use a mix of distress Ranger inks (names in the supply list) to  color the stencilled cardstock pieces.


8.Cut three flower images from Joggles Basilius Besler Botanical plate collage sheet and glue them over the central piece as shown. Use Gel medium to glue the pieces as this is the best medium to keep everything on place forever.


9. From this step  I am going to show the finished  pieces without extra photos as this is just " add mediums/stickers" techniques.
This is a full opened project and I am going to begin with the upper piece.

And this is how it looks with closed " folds".


 The whole inside was inked with a mix of two distress inks : Wild Honey and Peacock Feathers.
 This upper  piece was covered with  dark " wood" cardstock. The pink bird from Watercolor  birds Joggles collage sheet was cut and glued over it. I covered it with a thin layer of Glossy Accents and added white pen line and dots around. The Tim Holtz stickers were added on the lower left part.

10. Add a bird from the same Watercolor birds collage sheet over the flowers, cover it with glaze and add white line and dots around as shown. Add pink  Glimmer mist ( Tattered Angels Wedding Pink) over the finished pages and let it dry.


11. Now for the closed folds- this is a place to add the real gift card inside the project.
Glue two patterned paper pieces and add 4 black  photo corners to keep the card inside.Ink cardstock edges with distress ink before you glue them.
Cut two feathers from Joggles Watercolor pink feathers collage sheet. First cover them with DecoArt Crackle glaze and let them dry.
Then add Gold fluid acrylic  to enter the crackles and glue them as shown. Outline the feathers with white pen and add  white dots.

12. The " postcard" lower piece was painted with Chalkboard paint; then the paint was wiped and just a bit of stain left over the  piece. Add Verdigris Tattered Angels mist over and wiped it from glazed houses.Add a sticker on the bottom as shown and make all outlines with white pen.


13. Use Gold fluid acrylic to cover the crackle paste crackles over the cover piece . Then add Verdigris mist and even a bit of pink mist and let the cover dry. Glue it over the basic chipboard. Add the metal trinket to make a closure.


Monday, April 25, 2016

Journaling With Recycled Items

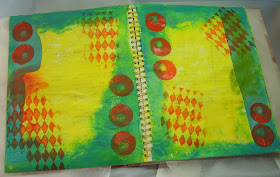
In a previous post I shared how I had found a spiral cookbook which I was going to use for a journal.  I decided to do another page in the recycled cookbook.

I had previously glued two pages of the book together so I had a stronger base for my mixed media.  I then added a layer of gesso to give the base for whatever would happen next.  One never knows where your creativity will go when you are working with mixed media.


I added some yellow paint to the page.  I did just do one page for the journal entry but I wanted the two pages to coordinate so you will see that I have worked on both pages for part of the creative process.


Another recycled item to be used on this page is a sales brochure from a department store.  I cut out all the dresses in the brochure and will use some of them in the final journal.  Along the side of each page you see teal colored paper from the brochure.


I have added paint in the teal color around the edge of each page.  I then stenciled orange on the pages.


Here are the pictures I cut from the sales brochure.


I decided to use the black and orange from some of the pictures.  I cut circles out of the chosen designs.


Here the circles are laid on the page.


The circles were added to the page along with a die cut Happy.  I also had gotten a new stamp set which had lots of happy statements on it so I stamped them on pieces of gray paper from the brochure and just cut them out.  I was not too neat in my cutting.  I also added some black stamping on the page.  I got out some sticker sheets and added the word happy in several different spots on the page.  I also did some journaling on the page.

Here is the finished page.


Next time you get that fashion sales brochure in the mail, take a look at it and see what beautiful colors are in there.  I kept another group of pictures which have lots of navy in them.

Wednesday, April 20, 2016

Create an Acetate Overlay Frame


Beatrix Potter would have been 150 years old this year, so I decided to mark the occasion with this overlayed framed picture.


To create the overlay I used alcohol inks onto an acetate sheet. I wanted to be careful to frame the picture, so I traced around the outline of the key points of the photo. Because the alcohol inks go on the back of the acetate, I flipped over the tracing.


The picture is now in reverse
.

Place the acetate over the tracing and hold in place with masking tape.Alcohol Inks give a random pattern especially when used with blending solution. I used an ink blending tool and added a felt piece, select the colours you wish to use then dab them onto the felt in your chosen pattern. Add a drop or two of blending solution so the colours blend together.

You can create patterns for flowers, leaves anything you can think of.

The colours blend nicely with the blending solution and give random effects, some are nice some maybe not so good ! You can always wipe away any parts you do not like with some solution on a clean cloth and gently wipe.
You can use the same colours, the same photo and it will come out very different every time.
When you are finished and the inks are dry remove the tape, and turn the acetate over and place it ink side down over your photo.

Did you spot the little Peter Rabbit I added ?

I hope I have inspired you to create some overlays. They are fun and easy to make.

Don't forget to add your art work to this months challenge, Recycle with a twist of using metal. Everyone of all experience levels is more than welcome to take part.
Most of all Have Fun ! I look forward to seeing your creations.

Monday, April 18, 2016

Imagine

Hello Mixed Media Mojo friends! Lucyna here. Hope you are all well and happy.
Today I am sharing a journal page I made inspired by a song ,,Imagine''.


I started with making a masterboard with stencils and acrylic paints.


Next I cut it into nice little pieces.


I found a leaflet with a silhouette I liked (recycling!).


Then I glued all the pieces on the other side.


Then I fussy cut the silhouette.


For the background I used the page I made earlier but didn't like at all.


So I put black paint all over it.


I added some colours with gelatos, glued the image and stamped the sentiments to finish my piece.


Hope you like it.
There is still time to join our current challenge.
The theme is Recycling and the Twist is Use Metal.
Crafty hugs to you all!


Wednesday, April 6, 2016

Finnabair Style 4 x 4 Journal Page

Hello everyone, Deb here for our Mixed Media Wednesday post here at Mixed Media Mojo.  I thought I'd share with you today how I made this Finnabair style 4 x 4 page.


One of the mixed media groups that I belong to (Mixed Media Studio on Yahoo Groups) is doing an ongoing swap where we are trading pages to compile into a mixed media techniques journal.  This month's technique was to create a page in the style of Anna Dabrowska, better known as Finnabair to her many fans and followers.  Although I've long admired Anna's style, I'd never attempted it before but now that I have I am hooked, what fun!  While making this page I also took the opportunity to incorporate some recycled jewelry and metal bits and bobs, so it fit in perfectly with our current challenge here at Mixed Media Mojo, Recycle with the twist of using metal.

I started out by cutting a 4" x 4" piece of heavy chipboard (I used a children's board book from the $1 store, yes that is Count Von Count and Big Bird pictured there!) and after sanding the page I coated it with gesso and gathered up a selection of metal items, old jewelry and charms, etc. from my stash.  I didn't end up using all of them but it was helpful to have lots of items to choose from as I composed my page.


I then adhered bits of tissue wrap, napkins, lace, ribbons, thread and coffee stained cheesecloth to the gesso covered board with Distress collage medium.  Once it was dry, I added some heavy bodied gesso through an assortment of stencils here and there and did some random stamping with Jet Black archival ink.

I left the board to dry overnight, then sprayed it with inks and stains in browns, greens and blues.  While waiting for the sprays to dry, I found a focal image online for my page (this beautiful young woman's image was courtesy of Magic Moonlight Studio) and backed the printed image with some heavy card for stability.  I positioned the focal image on the page where I wanted it to be and started to build the elements up around her.  I used the metal elements as pictured above and also added some paper flowers and buttons from my stash and adhered them all with E6000 glue.


Once the E6000 was dry, I painted all of the elements with gesso.  I then masked off the focal image and sprayed the 4 x 4 page again with the same colours of sprays, making sure that all of the gessoed elements were evenly covered.

As a finishing touch, I added some gold gilding spray to a few of the elements, added some faceted flat back gems here and there and then added a shadow line around the outside of the adhered elements with some black acrylic paint for contrast.


Thanks so much for stopping by today and I hope that you have been inspired to give Finnabair's style a try; it is so much fun and the results are quite amazing, truly an example of the whole being greater than the sum of it's parts!  I also hope that you will join in our April challenge


and do some recycling of your own!  Have fun and happy creating,

Deb xo