Pages

Wednesday, July 27, 2016

Altered Summertime Scrapbook Journal


Today I thought I would share how easy it is to alter a guest book, old diary, or any other type of book .

I decided to alter this guest book into a summer scrapbook journal.


I started by adding some texture paste to give the appearance of sand, and then I used watercolours over the top.

You may like to try a recipe by Tim Holtz to make your own sand. I don't have any of the products he used so I couldn't do it, but if you have those items you may like to give it a try as it looks interesting!

The girl is a Phyliss Harris stamp which I also coloured with water colours. I used some pink thread to create the flowing ribbons on her hat.

I glued some real shells onto the bottom of the cover, and finished by laying a ribbon down the side .

The inside pages all had printed titles on them, but these were easily covered with papers.

I hope I have inspired you to have some fun, and create something for this months challenge which is "Summertime" and the Twist is Shells which you can use if you wish.

If you try the Tim Holtz recipe, I would love to know how it turns out...

Join in the fun


Wednesday, July 20, 2016

Guest Designer Autumn

Today we welcome our super talented guest designer Autumn Clark from
Summertime fun brings to mind thoughts of spontaneity and timelessness. I was thinking of late nights when the tide is high, walking the shore. To translate that into my project, I started with a painted canvas board painted in shades of midnight with acrylics. Next, I scraped texture paste across randomly. When this was dry, I used a stencil and more paste to create a scalloped pattern. Using Twinkling H2Os I layered shades of blue and green over the white paste. I splattered them along the edges as well. Next, I embossed a dotty pattern in "Psychedelic" clear embossing powder randomly over the entire canvas, for a glittery pattern. I stamped a tiny pattern in black for more contrast.
For my stamped focal images, I painted a sheet of manila with watercolor, then embossed in black. I tore the edges of the stamped images, then sprayed them and my canvas both with blue, green, and black Glimmer Mist sprays.
Using the scraps from my watercolor panel, I die cut some fauna for embellishment. Then I sprayed a piece of cheese cloth with green Glimmer Mist. I used cardboard to build dimension under my stamped images, then glued the greenery and embellishments in place around them.
I tucked in some metal embellishments between the layers. Next, I dropped a good bit of gel medium onto my palette and sprinkled in some Art Stones and chunky glitter and mixed it all up. I spread this mixture randomly around the canvas and sprayed it with more Glimmer Mist in areas.
I filled a tiny bottle with art stones and a strip of text and attached it with hot glue. I dripped a small amount of alcohol ink over the glass to give it an aged feel.
I tinted some purchased flower stems with Glimmer Mist and added them for more dimension.
Thank you so much Mixed Media Mojo for giving me the opportunity to create for the Summertime Fun theme. This was such a rewarding experience! I appreciate your continued inspiration and thought provoking challenges.

We are sure that you have been inspired by Autumn's fabulous canvas to create something for our Summertime Challenge with a Twist of Shells. The twist is optional, and everyone is very welcome to add their art to the challenge.
We look forward to seeing all of your wonderful creations!

Monday, July 11, 2016

Sea and Sky Art Journal Page

Hello, Deb here today to share an art journal page I made with our July challenge theme of Summertime with the twist of adding shells in mind.

I started out with a double page spread from my art journal.  I stamped some random background images along the bottom with a light colour of acrylic paint and then coloured the whole page with multiple colours of Distress inks in shades of blue.  The acrylic paint resists the Distress inks so that the stamped images still show.  I also discovered that I had some splotches of glue or medium on the page after applying the Distress ink but decided to just go with it!


Next, I made a 'wave' stencil from some acrylic packaging and coloured some waves onto my page with more Distress inks.  I then did some spritz and flick with water and dried it all.

More stenciling came next with a Tim Holtz Bubble stencil and a Southern Ridge Trading Company Net stencil in shades of blue Distress ink again.  I then spattered the page with Mermaid Lagoon Distress paint, white acrylic paint, Salty Ocean Distress stain and Heidi Swap White Color Shine.


I wrote the lyrics to a Dusty Springfield song around the edges of the page with a black Pigma Micron pen (the song is called Sea and Sky).  I added some collaged images, a piece of cheesecloth stained with green Distress ink and then stamped and clear embossed Tim Holtz's Compass Blueprint stamp and a quote from his Life Quotes stamp set.

Here are some closer shots of the clear embossed stamps.


 I added a small Mirrored Star colored with alcohol ink to the center of the compass image.

The collaged images were cut from a book I had in my stash, I added a small star and a mermaid charm (both coloured with alcohol inks) to the tall ship tag.


I shaded around all of the collaged images with Vintage Photo and Mermaid Lagoon Distress crayon.

And to complete the page, I added some real shells to each bottom corner.  I added some twine under the shells on the left hand corner,


and added more mirrored stars coloured with alcohol inks to each shell cluster.  You can also just see some more stenciling that I added behind the shells, I used the negative from a Tim Holtz Wildflower die to add some 'seaweed'.

Hope you've enjoyed seeing my art journal page and that you will feel inspired to join in our July challenge.


I can't wait to see what you make, happy creating!

Deb xo

Wednesday, July 6, 2016

Summer Nautical Fun

Barb here to talk about the monthly challenge for Mixed Media Mojo which is Summertime with the added twist of shells.

What is more summertime than nautical.  Getting out on your boat be it a dingy or a sail boat or anything in between, it is such a pleasure to feel the wind in your face and soak up the sunshine.  This is the card I made for the monthly challenge and I am sharing the steps I used to create the card.


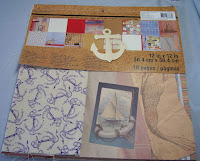
This is a 5 x 7 card with many layers.  I love to create with layers.  This is the collection I started with.  It is from the Recollections Line at Michael's.  It has paper, cardboard, canvas (plain and printed) and burlap.  I bought the wood anchor at Michael's also.  The sentiment, distress paint and the Tattered Angel spray were from my supplies along with the card base.

Here is the collection I used.


To create the color on the wood anchor, I first painted it with Distress Paint (Hickory Smoke).  I then added a layer of Distress Collage Medium (did not see anything from this layer) and then sprayed with Tattered angels Glimmer Mist (Woven Burlap).  I really like the color I achieved.


I went through the collection of paper and cut out the elements of paper I wanted to use.  All the images are on 12 x 12 sheets of paper in the pack.  I took out my distress tool and used it around the edges of all the paper.


Here is another picture of the anchor.  I added twine at the top of the anchor and tied a couple knots.  I pulled off some threads from the fabric strip and wound them around the top of the anchor.


I added embossing paste to two of the images.  I used a stencil on the Post Card and just smeared it on the sailboat image with my pallet knife.  After it had dried I dabbed on some of the Woven Burlap Glimmer Mist to give the paste a more aged look.


After all the images were ready, I adhered to the card base with my ATG gun, foam tape and the trusty glue gun.  One thing I have found that works great for making layered cards is when you lay out the pieces, take a picture of it with your phone and then when you go to reassemble the card, you have a picture to look at so you end up with the card you had originally planned.

Here are some close ups of some of the elements of the card.

The anchor.


The top of the sailboat image.  Here you can see the embossing paste and the twine that was just looped and tucked under the sailboat.


The bottom of the sailboat image and the bottom of the left hand side of the card.


The birthday sentiment, corrugated cardboard and the embossing paste on the sailboat image.  You can also see the top of the postcard and anchor.


Thanks for stopping by today and checking out how I made my card.  Please join us for some Mixed Media Mojo fun this month.

Friday, July 1, 2016

Mixed Media Mojo Summer Fun!

Happy Summer and Welcome to July! 

Our Mixed Media Mojo Diva for June is:  eMKa!
Congrats!! Please contact our Guest Designer Coordinator Jannet - (gillslap AT yahoo.co.uk.) for your badge and information on being our next Guest Designer!


This month we are thinking Summer with our Summertime Theme and the twist is to use Shells! 


Be sure to swing on by our fabulous Design Team to see what they cooked up:


 Barb


I hope you will play along with us this month! Please link up below a new project created for this challenge and do not combine with more than 6 other challenges. Limit to 3 entries per person. You can be the next Mixed Media Mojo Diva!

Thanks for stopping by!

Maria