Monday, February 27, 2017

Brave Heart

Hi everyone, I'm Christina

I read somewhere that you should do one thing a day that scares you. For me that would be stepping out of my comfort zone in the creative world. Sometimes I tell myself to breathe, get back to work and create something brave and new. So, I decided to alter Tim Holtz idea ology mini clipboard and make it my own.

So here we go.....!


Title: Brave Heart


Start by taking apart the clipboard holder.


Apply black gesso to the clipboard, any brand will do.


Die cut and emboss the layered bee die out of chipboard from Tim Holtz Sizzix Alterations


Using the Tim Holtz Sizzix Alterations mixed media die, I used manilla paper from the #10 tag.


Apply Ranger texture paste through a variety of stencils, I used Tim Holtz Flourish, allow to dry or to speed dry use a heat tool. 


Once you have everything in place, the layered bee, gadgets/gears/beads etc. cover with a layer or two of black gesso. Heat set.


Now the fun begins......!
Using your finger, start rubbing in beeswax of various colors to give dimension and make your pieces come to life. I used Art (c) beeswax in gold/silver/bronze. For the more detailed parts I used a fine paint brush to add colour. 


Distress crayon, Smokey Sky was used to add more colour and give a vintage vibe to the piece. All you need to do is rub it in and a helpful tip....a little goes a long way.


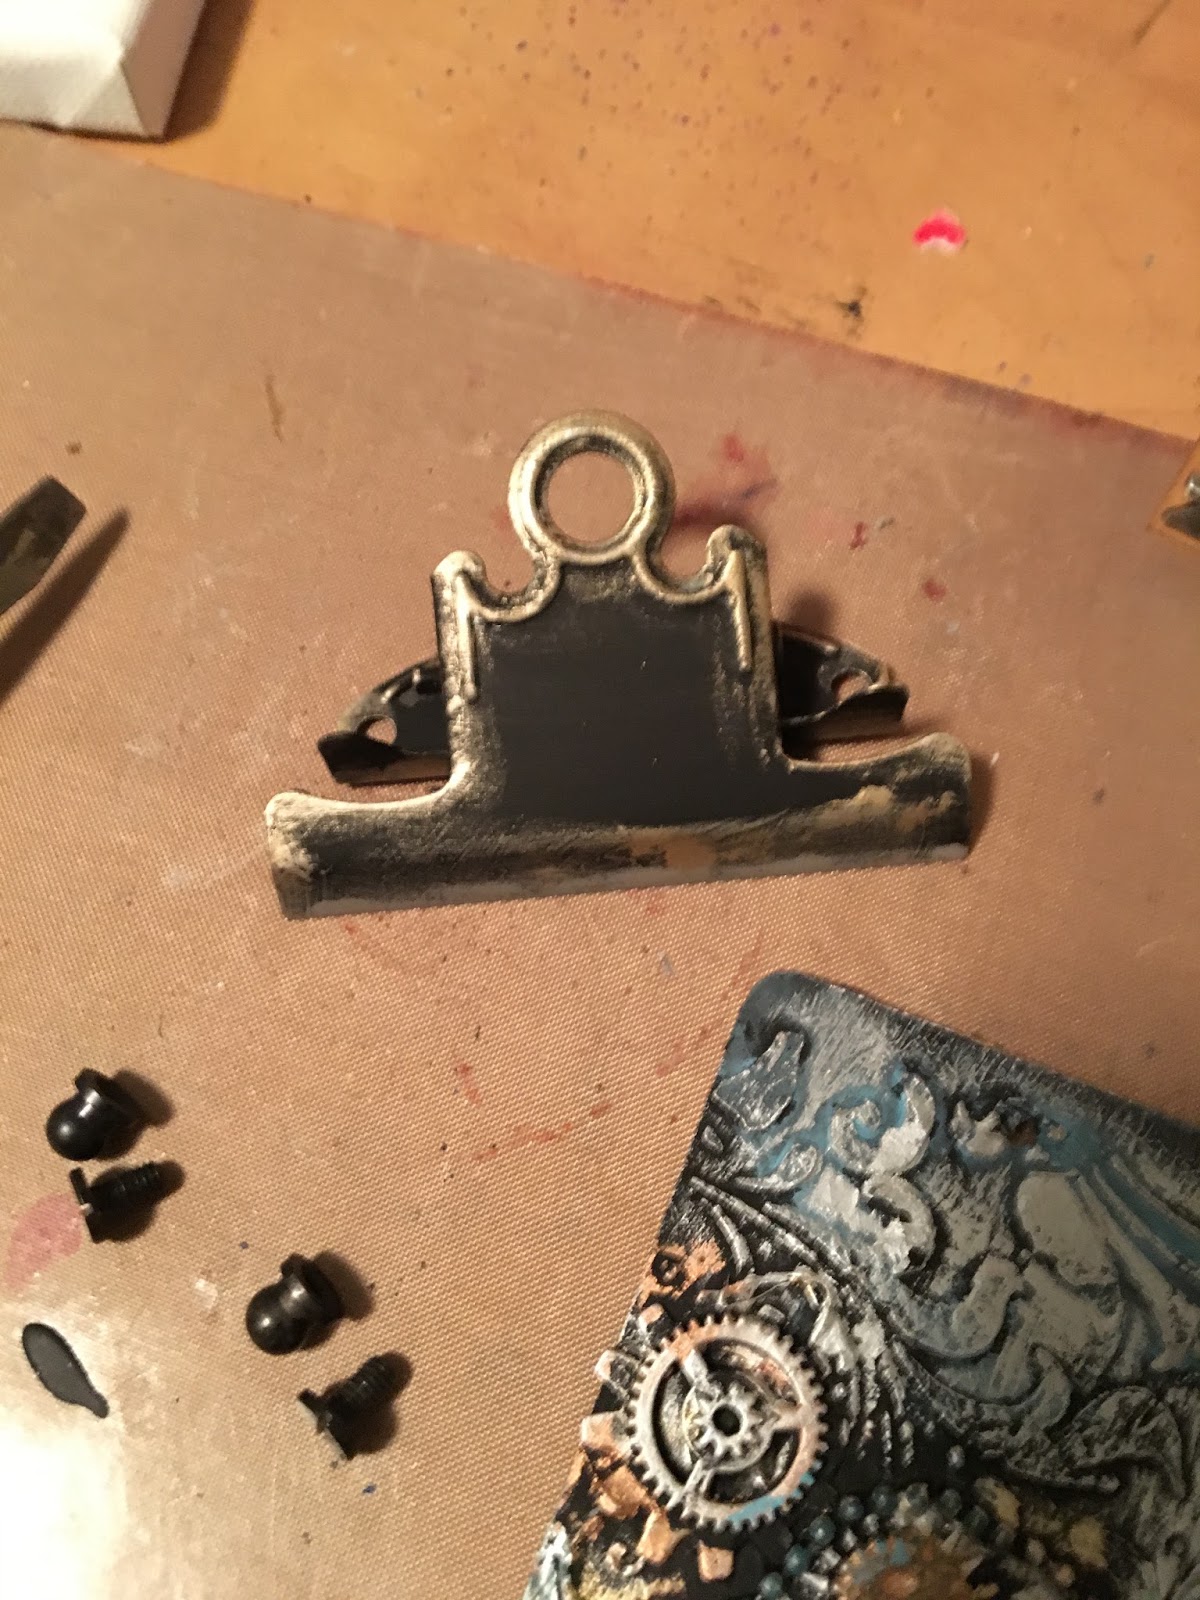
Apply black gesso to the clipboard piece, heat set, then rub in a bit of the gold beeswax for a vintage effect


Here are two different techniques using the same layered bee die. As Tim Holtz would say this is definitely a "game changer"

Hope you enjoyed my tutorial and when you get a chance come on over and join the fun at our February challenge Love with a twist Wings. We can't wait to see what you create!

Christina


Wednesday, February 22, 2017

Heart Has Wings

Hello Guys!

With this month’s theme Love and Wings, we’ve created a journal cover tutorial for you’ll!


Supply List-
Journal Cover
Dusty Attic- Entangled Heart and Elegant Frames chipboard
Its Bitsy- Wings Chipboard
Prima Mechanicals- Flowers, Vintage Trinkets
Prima Art Stones
Prima Glass Glitter Copper
Prima Heavy Gesso White
Pieces of scrap paper
Papericious transparent domes
Prima Colour Bloom Antique Gold
Inka Gold Copper
Lindy’s Stamp Ganga Spray- Rizzo Rowdy Red, Blazing Black, Sidewalk Chalk, Peony Scarlet Red, Mission Bells Brown
Alene’s Tacky Glue 

Step 1:
Tear some scrap paper, and stick that along the top and bottom of the page using mod podge.  


Step 2:
Apply heavy gesso and cover the surface. Gesso, the chipboard pieces, domes and prima mechanicals and assemble on page. Once happy adhere them with glue.


Step 3:
Mix the art stones with gesso and randomly apply them on the page. 


Step 4:
Start playing with colours. Add randomly and stop when you feel good :)!   Once done, add glue at some spots and sprinkle the glass glitter.


Step 5:
Stamp the sentiment and stick it on the page. Using Inka gold, highlight certain textures by running over them with the finger.  


Hope you enjoyed this tutorial:)! Looking forward to your creations:)!

Here's a video link
https://youtu.be/b35WduOi90k

Regards,
Sunila & Aditi
Dots to Lines


Monday, February 20, 2017

Mixed Media Framed Art tutorial

Hello everyone and thanks for stopping by today. Ann here and I've got a quick tutorial for you on how I made my Mixed Media Framed Art for our current challenge, Love with the added twist of Wings. Enjoy!

If you recall, this is what my project looked like:


To get started, I placed a few small dollops of acrylic paint onto the craft sheet, then use the brayer to gently spread out the paint. When the paint has been spread out, gently "walk" the brayer across different parts of the the panel. Repeat the above process using different colors. When it dry, I die-cut the lower left corner and the upper right corner and stamping randomly.


I punched out several hearts, glued them together, then smudged the paint with my finger. Die cutting feather, painting the die cut with Distress Paint.


I'm featuring two of my new dies from Spellbinder, designed by Seth Apter. I just love these dies called Drip Drop and Robo Rings. I've used the acrylic paints to colour the die cut images and let it dry. I applied a layer of crackle paint on the Drip Drop. Stamping the Robo Rings.


Here are some close ups of the project.


And this is the completed project - I am really happy with how it came out. I hope you like it!


Thanks so much for stopping by and  hope this inspires you to join in our February Challenge, you still have a few days to enter! Can't wait to see what you make to link up and as always, happy creating!

Hugs & Love
Ann

Wednesday, February 15, 2017

It's Heart Month

Hi everyone! It's Cathy here with my first actual post on the Mixed Media Mojo blog! I am very excited to be a part of this talented team and look forward to seeing all the mixed media projects you share with us! This month the theme is love with the twist wings! Be sure to check out the original challenge post HERE and share your creations with us!


I created a 6X6 canvas for my love with wings project this week.

I found the heart with wings stencil in an old box I still had packed away in my storage closet. Perfect timing to to de clutter and make use of my stash.
I started with a black canvas but did a quick coat of black gesso just to cover up some spots that had been rubbed a bit. I then mixed my distress spray with some iridescent medium I had so there was more shimmer and used that for my heart with wings and a few chipboard pieces I wanted to use.

I re discovered my jar of glass bead gel and decided to use that too. Mixed with a bit of pink mica powder from Finnabair's line I layered it on through my TH stencil. A crafty friend of mine thought it was heart shaped hamburgers when I posted a sneak peek of the hearts! LOL

I used my Charred Gold ep from Emerald Creek to highlight some of the rays shooting out from the heart. I then used Eileen Hull's Twist and Style tool for wire hearts. And to grunge things up a bit, I splattered some ground espresso paint across the whole thing. The last pic in this collage shows most of the products I used.
And now for some close ups of the project!

I embossed my TH thinlits words with Charred Gold as well, and used some of the new gemstones from the Emerald Creek Quarry line on the rays and to dot my i.

Just love the Twist and Style tool and with a bit more practice, I'm going to try doing words with it!
Love these gemstones! These are the Pyrite and Moissanite stones and the picture does not do their shimmer justice!

Look as this glorious melty goodness of my Charred Gold embossing powder!! I use this on just about everything these days!

I also went in with my embossing pen and added some Charred Gold to this heart too.
Thank you so much for stopping by today and don't forget to get your entry in for this month's challenge! We have a $25 GC as a prize this month!! Thanks to our amazing sponsor Everything Mixed Media!

Have a great day and I'm excited to see what you create and share with us here at Mixed Media Mojo Monthly Challenge with the February theme of Love and a twist of wings!

Cathy

Sunday, February 12, 2017

Back to Basics

So for my second post for the DT of Mixed Media Mojo- I wanted to do a tag and go back to basics with techniques. Now I am a lover of all things Tim Holtz and have taken his classes in person and online!  His techniques are tried and true and I find myself going back to them for projects.  Since it is February and the theme is love with wings as the twist, I made a Valentine Tag!  So let's get to it!
First I took a #12 Tag and used the Valentine Embossing Folder from Tim Holtz and embossed the tag. Then I ran a brayer with Distress Antique Linen paint over the raised parts of the tag. This technique is called paint resist technique. When you let the paint dry and go over it with ink, the paint will come through in a distressed look!
Make sure your tag with the paint is dry before you start on the second technique.
The second technique is wrinkle free distress and I love it!  You just put some ink on your nonstick craft sheet and then spritz some water over the ink. You can slide your tag through the ink or press it down. I used Distress Picked Raspberry, Festive Berries, Vintage Photo and Tea Dye ink. Once you have done that, dry your tag with a heat tool and then you can go back and get the areas that you missed. Dry again with a heat tool.
I love this distressed look of ink and the paint!  You can go back with a blending tool and add more color and some water drops if you like!
Next I cut out some chipboard and an old book page for the cupid and the heart. This die is from Tim Holtz and I love it!
I applied Distress Black Soot Ink to go around the tag. Then added Tim Holtz Ideaology metal embellishments.
In the end, I added red and silver embossing powder from Ranger to the heart. I thought it needed  a little color and some chit chat words from Tim Hotlz.
I think that Distress Tea Dye is my new favorite color! It's fantastic and if you haven't used it, you need to!  The great thing about mixed media is you can add or take away as much as you want!  I used some hearts from my bead stash and just painted them the color I wanted.  So that is it and I hope you have enjoyed this tutorial!  Love and Peace!