Pages

Wednesday, January 27, 2016

Bleeding Art Tissue

Hello Everyone,

Jannet here, I was a guest designer last year, and was lucky enough to be invited to join the Design Team!

I have recently been playing with bleeding art tissue, so I thought I would share my discoveries with you.

It is an easy, quick technique which gives really nice results. It stains your hands very prettily too! (It washes off ok)

The first thing I discovered is not all tissue bleeds, the packet has to say "Bleeding Art Tissue" I found this pack quite inexpensively online.

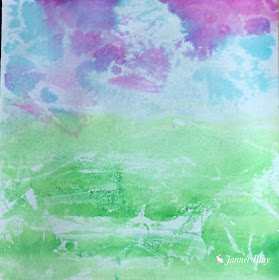
I started by randomly tearing small pieces of tissue, and laid them on my card. I used 250gsm card, it did buckle a little when I went a bit mad with the spray bottle, otherwise it held up quite well.


After laying the tissue I spritzed with water until I could see the colours bleed from the tissue. I found that the pastel shades did not give such a good result but the brighter, darker ones did. I then lightly brushed over the tissue, and then eagerly removed the tissue leaving a wonderful mix of colours.
If you crinkle the tissue up before applying, it gives a different textured effect.

I ended up with lots of different backgrounds, which I will use to create various pictures.

I added a fairy stamp and a dandelion stamp to create this scene. A generous sprinkling of glitter added some sparkle to the dandelions, and I also added some flowersoft to the flowers in her hair.

If you give this technique a try I hope you have fun, l would love to see the result.

Don't forget there is still time to enter the Winter Challenge with a Twist of Glitter


Monday, January 25, 2016

Snowy Day Art Journalling

Hey there!

We got hit on the East coast this weekend with a blizzard!  So on Saturday we were stuck inside all day.  I love not having places to be and just do want I want.  The kids got to play, I got to play and we watched Netflix!

One of my plans for 2016 is to play more in my art journal.  I love Dylusions journals and have a few but I wanted a different one.  I have used simple inexpensive journals from Jerry's Artarama but the pages are thin and meant to be more of a sketchbook.  I would gesso every page first which gave it stability.  That worked fine but this time I wanted to avoid always using gesso.  I have the Strathmore Mixed Media hard back journal which was recommended by Joanne Sharpe. (I'm currently taking her awesome year long class called The Artfully Inspired Life. )  So far I have only used Tombow markers for watercoloring in it but it's a great journal.  However it's a bit expensive.  I snagged mine from Michael's at 1/2 off.

So for this new journal I didn't want to spend a whole lot as I want this journal to be something to play in, experiment and make mistakes etc.  While at Michael's last week I picked up this journal by Artist's Loft.  This is considered a sketchbook as well with a weight of 75lb paper.  So yes it's somewhat thin like my other one but the paper felt a bit better.  I figured with a coupon and only about $5.00 why not try it.

While stuck on Saturday I just played around with it using Dylusions paints!  Right now Dylusions are the only paints I grab to play with.   The above is a pic of my collection.  Dyan has also just released 6 more colors at CHA this month so I can't wait to get those.

Here are some pages I created.  Now remember I was just playing and messing around with the original intention of not sharing this journal but that's silly right?

 On this page I used a circle stencil to create the colored circles.  Then while watching TV I grabbed a micron pen and add the shapes and doodles.  I'm sure I'll mess around more here but this is what I have right now.

 Yeah I am kind of liking circles and circle stencils.  so here we have more colored circles like above.  Then I thought I can fill in the white with Dylusions black paint.  Well, I did around all the empty spots and then thought it was too annoying to get in between the circles etc.  I supposed I can mask them but just went with it.  Used a white Signo pen to doodle.

On this page (which is the 2nd page in the book because I skip the first page :-) ) I used my fingers to paint.  I was inspired by a youtube video by Maremi.  The circles here are from using some punchenella which is the waste sheets after sequins are punched out.

As you can see these are all pretty simple and basic but just fun to create with no real goal in mind. I'm excited to just keep playing, try out some new ideas and techniques etc. Next up I was checking out some Gelli Plate videos and pulled out my 6x6 plate to create with.  I'll share some pages soon.

Thanks for stopping by!  I hope you will come and play along with us in our current WINTER themed challenge! 


Monday, January 18, 2016

Word for Year

In November, I shared how I was recycling a cookbook I found at Goodwill and I planned to make it into a journal.  You can find  that initial post at this link.

For 2016 I have chosen Explore as my word of the year.  I retired in July 2015 and now I have the time to explore.  There are so many things that I wish to explore.  I wish to explore the world of art and learn new things, try new things and develop my talents.  I want to explore the world and travel.  I already have two trips planned for this winter to escape the winter cold.  I am contemplating a trip west in August to visit family, friends and do some art stuff.  We will see.  I also need to explore my house - I need to see what hidden artifacts I have in this house and clean/clear them out.  I do get distracted when I do this.

Here is my double journal pages in my recycled book.  Please do not be critical, I have done very little journaling.  I am having fun and exploring all kinds of new things.


Here are close ups of some of the elements on the pages.

Do you see one of the birds I have been drawing was laying on the table and he decided since he was the same color he should be on the page.  All the "explore" words were stickers that were gifted to me by a friend as they were moving.


The orange flower is embossing paste that has been colored.  I tried to outline the petals with a black pen.


The black circles were done with the end of a toilet paper roll dipped in black ink.
See those little white things that look like Pac Man - those are the inside of the letter stickers.


I used Dylusions paints on my pages.  If you have not tried these paints, they are fantastic.  They are worth the investment.

Here are some more picture of how the page evolved.


Thanks for joining us on our Monday journal entries.  Don't be afraid to try something new - EXPLORE whatever interests you.

Monday, January 11, 2016

Glittery Snowy Fun!

Hey there!  Maria here today with a art journal layout based on this month's challenge!   I hope that you will come play along with us this month!


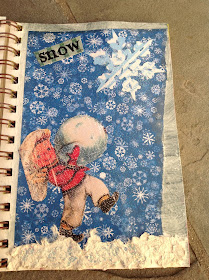
This is a layout in a Strathmore Mixed Media Visual Arts journal. It's a 5x7 size.  I'll admit this is not a brand new layout that I just created but I also never shared it!  It's perfect for this challenge though.


The background consists of basic craft paints then I layered with scraps of pattern paper in fun winter colors and themes.  I used a gel to adhere it all.  The cute kids are cut out from a great pattern paper I had in my stash.  The "snow" is actually a paper fiber paste I had on hand.  I added some dazzling diamonds glitter to the paste.


Here you can see some of that dazzling glitter

While the page was wet from the gel I sprinkled more glitter all over to give it a all over glittery look.


Thanks so much for stopping by today!!!  Come play along with this month's challenge!
Maria

Wednesday, January 6, 2016

Snow Fun

Hey there!

I hope everyone had a fantastic New Year!  Let's get going for a fabulous 2016!

Today I wanted to share with you a few more details regarding the snowman piece I made for this month's challenge.  This month our theme is Winter and the twist is Glitter!


Here is the piece:

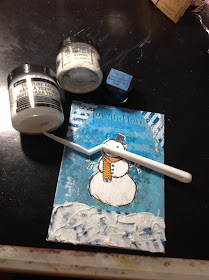
This was created on a 5x7 canvas board.  I love working on canvas board as it's inexpensive to buy and easy to work with.  If I want to hand this I just had a clear plastic hook to the back like these:


Here are some steps and products I used:

This great snowman set is by Stampers Anonymous, the stencil is part of the Dina Wakley Scibbly Holiday Birds stamp and stencil set. I used some basic craft paints as well.  I used the Dylusion Spray to color the scarf.  All you do is spray a bit on a craft mat and pick up the ink with a brush.  I like to use the Ranger water brushes.


Here i added some washi tape! LOVE love washi tape.  I got into a craze recently and acquired lots of it.  Finding it all over on sale with coupons etc... LOL! 

Here I used Ranger texture paste for snow, Ranger Clear Rock Candy glitter, Blue Ultrafine glitter.  I have to say I LOVE the Ranger Texture paste for what I use it for.  I have the artist kinds of pastes by Liqutex etc but I do love working with this one mostly.

Thanks for stopping by today!! I do hope you will find some time to get creative and play along with us this month!  Can't wait to see what you do!


Maria

Friday, January 1, 2016

Happy New Year!!


I hope the holiday season was great for everyone and let's get ready for a fantastic 2016!

This month our theme is Winter and the twist is Glitter!

Check out what our Design Team did and be sure to visit their blogs for more details:


I hope you will play along with us this month!  Please link up below a new project created for this challenge and do not combine with more than 6 other challenges.  Limit to 3 entries per person. You can be the next Mixed Media Mojo Diva! 


Thank so much for stopping by! I can't wait to see what you create!

Maria