Monday, May 29, 2017

CELEBRATE LOVE Canvas Tutorial


Hello all! I am Monica and I am back again this month with another tutorial for you on how I made my May design team project. This month I did a canvas for the theme of Celebration and the twist of wedding. So here is a basic tutorial on how I made the project.

Step one of the canvas I just added some texture using modeling paste.

Then for the next step I added colour by spraying the canvas with some of the
Prima Colour Bloom Sprays

The colours I used for the sprays were Empress Gold, Tea Stain and Ginger Coral. The colours are quite vibrant when first sprayed but I wanted more muted colours so blotted off the excess with a paper towel to get the look I wanted.

I then added some shimmer using gold Glitter Dust spay

My next addition was the dress for for the wedding dress. I just cut out the dress form using my Tim Holtz Sewing Room Sizzix Die. I used chipboard and then adhered some basic text tissue to it before I cut it out. Then I added a white sparkly dress to it - I used the same die and just cut out the dress portions of it to make the dress.

The next step was to add some more texture to the piece, so I used a brick stencil and added some of the new Finnabair Stone Effects Paste. I used the Concrete on as I wanted it to look like stone. I added it in a few places in larger sections and then cleaned off my pallet knife on the canvas in a few places (especially those with other texture already) just to add some of the concrete colour over the whole canvas and pull everything together. 

The next step was to finish off the wedding dress and I did that by using some nice white lace and the Finnabair Sculpture Medium. This medium dries clear but makes any softer or thinner material thicker and solid. I coated each piece of lace I had and then laid it down on the canvas in some wavy patterns (to make it look like the dress was blowing in the breeze) and then once the sculpture medium dried the lace stays in that shape.

I then added some other elements to the dress - some ribbon, some glitter and a flower to finish it off.

Here is a close up of the ribbon, lace and glitter. To finish off the canvas completely I added flowers and my title pieces in chipboard. I sprayed the "Celebrate" chipboard with one of my new Marabu Art Sprays (I used Gold) to give it a nice shimmer and bring out some of the colours in the other ephemera I added to the project. I finished off the project by adding some flowers and other bling.

Here is the final project.

I hope you all like my project and the tutorial. I really enjoyed this project and love that it came out pretty much exactly how I envisioned it in my head. Make sure you check out and join the challenge on the blog - you could end up being named our Diva of the month and be a guest designer. We also have prizes sometimes too - so check it out! May Challenge

And we have a new Facebook group too that you can join! Mixed Media Mojo Facebook Group

Take care and have a very crafty day everyone!


Wednesday, May 24, 2017

May Guest Designer


Hello, it's Gaylynn as the May Guest Designer with this mixed media styled wedding card.


It is not too late to join in. The theme for the May 2017 challenge at Mixed Media Mojo is celebration with a wedding twist.


For my project, I added a distress oxide watercolor background, wet embossing with a stencil and modeling paste, dry embossed sentiment panel and roses, as well as stamped die-cut flowers and leaves.


I made a video tutorial for this project:


Supplies:  Altenew Vintage Roses stamps and dies, Vintage Flowers, Super Script 2 and Sketched Lines Stencil; Liquitex modeling paste, Tim Holtz distress oxide ink, My Creative Time dies, VersaMark, embossing powder, heat tool, vellum, Ranger archival ink, MFT ink, foam tape and brads.


Have a lovely day.

Still Celebrating A Wedding

It's Cathy here today to share another wedding celebration! Have you shared your creation yet? Don't forget to celebrate...with the wedding twist! Make sure you add your link on the original post HERE

This project I went fairly traditional! Not sure why, but I think it was due to this lovely couple from the TH Paper Dolls collection. I have never used 'people" before but have to say...I love these! so many ideas for them, I want to add people to everything!

I used Ranger Distress Paper, then inked it up with my Distress Oxides in Vintage Photo and Walnut Stain. I then blended on some Broken China and splattered it with water so I got some droplets showing on the blue. I gave it a quick shot with my heat tool and then used embossing ink through the TH stencil and embossed with Charred Gold Embossing Powder from Emerald Creek. I inked the chipboard quote pieces with the Broken China as well.

I dug through my Paper Dolls and found this adorable couple and they fit the theme just right! I coloured in the roses for the bride in red. I then embossed two heart charms with the Charred Gold, just the right touch to go with the quote.

And here is the completed project!


A close up of the bridal flowers. I love this couple and you could customize the coloured roses to go with the colours of the wedding you might be attending and giving this too.

You can see the gorgeous blue in the background and the splats I got from the water, and then that gorgeous melty goodness of the Charred Gold.

And you can't have an important event with out your little 4 legged family! :)

Thanks for stopping by and don't forget to share your creations with us :) 

Have a great day everyone!

Cathy

Sunday, May 21, 2017

Zombie Bride and Groom Card Tutorial

For the May Challenge at Mixed Media Mojo the theme was Celebration with a Wedding Twist.  Christina Sedora fellow DT Member at MMM and I LOVE the Tim Holtz Zombie Man die! So I had to use it for this month's challenge! Let's get started!


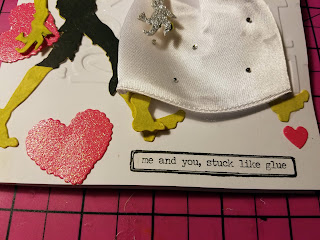
For this card, I used  Sizzix I Love You embossing folder, Tim Holtz Zombie Die, Tim Holtz Accessories Die for Hat and tie, Jolee Bride dress, Tim Holtz Flowers.
I first embossed the A7 card with the embossing folder.  The card is bigger than the embossing folder so I left a border around the embossed portion.


After die cutting two zombies, I painted them with Distress Peeled Paint by Tim Holtz. This is the perfect color for zombies!!!  Then I die cut the groom zombie with black card stock to make his zombie tuxedo, die cut with black paper for the top hat and tie.  I used pink glitter paper to die cut the hearts. This is all in the Tim Holtz Accessory dies.


For the Zombie Bride, I used Jolee satin stickers for the Bridal Gown, I used Tim Holtz Silver sparkle washi tape for the gloves, a little sprig of tulle for the veil and Tim Holtz Flowers for her bouquet.


To finish up the card, I die cut some glitter hearts from the Tim Holtz Accessory die and used Tim Holtz Chit Chats for the bottom sentiment! This was a great card to make and very easy to make!


Please join us at the May Challenge at https://mixedmediamojo.blogspot.com/

Thanks Juli


Wednesday, May 10, 2017

Tag tutorial

Hello everyone,

We're back today with an easy to make tag tutorial for you'll.

Before that did you check the ongoing challenge? Do check it out here.


Onto our tutorial now:

Supplies:

  • Manila Tag
  • Jet Black Archival Ink
  • Craftyscrappers- Raining Hearts and Mermaid Wishes
  • Dylusions- Fresh Lime, Vibrant Turquoise, Calypso Teal, Cut Grass
  • Tim Holtz Stencil- Flourish and Scribbles
  • Distress Ink- Peacock Feathers, Blueprint Sketch, Forest Moss
  • Zig markers


Step 1: Stamp using a background stamp and black archival ink onto your tag.


Step 2: Using Dylusions add colour on the tag, blending some shades on the tag.


Step 3: Use a stencil and stencil with Dylusions on the background


Step 4: Using distress inks and another stencil, add some more texture on the tag.

Step 5: Using a focal element stamp set, stamp on the background. Stamp focal elements on separate paper, colour and cut them. Then arrange them on the tag.


Add string/cord and your tag in complete!


Hope you're inspired to create and do participate in the ongoing challenge!
Regards,
Sunila & Aditi


Monday, May 8, 2017

Mixed Media Altered Canvas Tutorial

Hi everyone, I'm Christina.

Today I'm going to share with you the mixed media altered canvas I created, for this months challenge theme: Celebration with a twist Wedding.

Meet Pricilla. She's full of spirit and has a heart of gold....waiting for the man of her dreams. In the meantime you can see her all dolled up as she heads down the aisle with her abundance of flowers and glitter in her hair.

Let's get started......


Grab any size of canvas (I chose a 5x7) and cover it with Tim Holtz idea ology adhesive sheets, burlap. Then cover it with distress spray stain black soot. Heat set.


Next I used TH layered stencils, Industrial and Halloween with texture paste and let air dry. Once dried, apply distress inks Wilted Violet and Candied Apple on top.


Stamp image twice with Ranger archival ink - black on TH distress watercolour card stock (on the smooth side) and colour with various distress oxides and a h2o water brush.


Using TH mini snips, fussy cut "Pricilla" all the flowers and use pop ups for dimension. Add rhinestones in her hair and color them with an oil base marker. I used a copic marker. Doesn't she look pretty.....


Using a mini sponge tool and distress ink black soot, go over edges of stamp to make her pop out. The stamp I used is from Stampers Anonymous Day of the Dead 1.


For an added touch I used some of my favourite Tim Holtz idea ology finds - arrow adornment, skull (notice I added a couple rhinestones for the eyes with a little color for creepiness), metal corner.

I hope you enjoyed my tutorial and it leaves you feeling inspired.
There is still time left in the May challenge Celebration with a twist Wedding. We'd love to see what you create.

Have a great day,

Christina

Wednesday, May 3, 2017

Celebration/Wedding tutorial

Hello everyone and thanks for stopping by today.
Ann here and I've got a quick tutorial for you on how I made my project for our current challenge, Celebration with the added twist of Wedding. Enjoy!

圖像裡可能有文字

This is what my project looked like:

Step 1 : Stamp the image using VersaMark Ink Pad. Pour embossing powder over your image to cover all inked areas. Heat the embossing powder with a heating tool until completely melted.

Step 2 : I using spray inks to do a blue sprayed background. Let it dry. Lightly spritz it with water.

Step 3 : I die cut the Tim Holtz SEWING ROOM Dress Form die from the chipboard. Paint with acrylic paints.

Step 4 : Sewing the doll wedding dress.

Step 5 : I added some punched butterflies from Martha Stewart's punch and some gems over the skirt. I adhere the dress to the dress form and decorate a necklace.

And this is the completed project. I hope you like it!

Thanks so much for stopping by and hope this inspires you to join in our May Challenge. Can't wait to see what you make to link up and as always, happy creating!

Hugs & Love


Ann