My name is Irit and I am an Israeli designer and the new member of this fantastic challenge blog.
In my real life I am a Dentist, wife of a retired high police officer, Mom of 4 adults and a happy grandma of two adorable kids. In my spare time (thanks God for the empty nest) I craft and make art and then spend more of my spare time on the folk dancing room floor.
A few years ago I began my artistic journey with scrapbooking. 5 years later I am mostly Mixed Media artist and CAS cardmaker. Yes. One side of my soul likes everything messy and colorful. The other one asks for a quite white, with just a bit of stamping, cards. In the middle I still scrap (only when I have perfect studio photos); I work with polymer clay; I am pretty much addicted to resin art too.And I design for a dozen companies too. Middle age can be a blessing!
As I say- my strength is my versatility and it's pretty obvious when to visit my BLOG.
So today I am going to share a small tag tutorial and I think those technique can be used on cards, layouts, canvases and whatever.
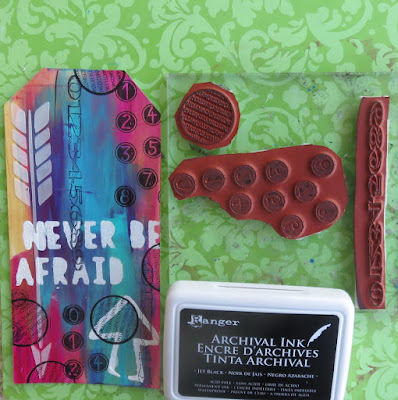
I made this simple- not so - tag with paints, stencils, mediums and some letter stickers and it's all about counting your own blessings.The whole concept was made because of the number stamps. First I decided to use them. Then I picked the saying. Then everything else was done around those two.
So the new Pick a number stamp set from Rubber Dance Art Stamps is a star of this tag as you can see.
So let's see how to make this tag!
1. Make a hand mad tag (or use the real one if you have it) and cover it with 3 colors of fluid acrylics.
3.Use another stencil and add some wording with white acrylic paint. Let the paint dry before the next step.
4.Stamp the numbers randomly over the painted tag using permanent black ink. I also added some more numbers later and this is not shown on this photo, but on the final tag only.
6.Add a few final touches to your finished tag. First I added the letter stickers to make my title. Then I outlined the white words with black fine markers. I also added some white doodling over the edges with white pen. Tie the ribbons and your art tag is done.


Fabulous tag Irit! Thanks for the tutorial! Definitely will give it a go.
ReplyDeleteWONDERFUL TAG!
ReplyDeleteFabulous colours and textures on your wonderful tag Irit, thanks so much for sharing it! Deb xo
ReplyDelete