Monday, March 27, 2017

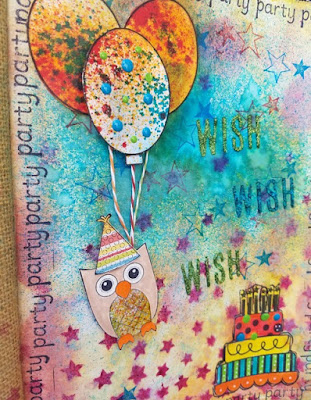
Happy Birthday Journal Page

Maria here with a tutorial on my birthday themed journal page this month:

This month we have a great sponsor once again with Everything Mixed Media!


I used the new Dina Wakley Media Journal.  


This is one of the watercolor pages.

Steps:

I used one of the watercolor pages in the book.  This book is fantastic and has 4 different type of papers: handmade cotton rag watercolor paper, burlap, kraft paper, and thin fabric canvas.  I started with Distress Oxide inks direct to paper.


Like the regular Distress line the Oxide's react with water.  And you can create layers upon layers and get an "oxide" effect which is slightly different from the regular distress inks.  Be sure to dry your layers in between.


Distress Oxide inks are unique because they are a fusion of dye and pigment ink which creates a chalky like finish. But it's not chalk ink.   


Stampin Up Stencil and spray ink from Lindy's Stamp Gang

Just a little Distress Spray stain for fun


In Powerpoint I created balloon shaped images and printed out on cardstock

Sprayed sheet with Dylusions sprays.


Cut out

"stamped'" balloon into Perfect Medium added clear embossing powder and heat set. Creates a great clear sheen.


Used pop dots/dimensionals to adhere to page along with paper string from Tim Holtz.  I stamped in black the sentiment "party" all around the edges to create a border. 


Liquid Enamel by Ranger makes a great accent

Unity Stamp Co Stamp and Tombow Markers

I thought it would be fun to create my enamel dots to be used later.  On wax paper (the waxy side) I put some drops of each color and let dry.  Then you can easily remove them and adhere to projects.

I used those enamel dots on the cake.


Thanks so much for stopping by!  There is still time to play along with us this month and for your chance to win a gift certificate from  Everything Mixed Media!

Wednesday, March 22, 2017

Happy Birthday with Oxides!

Hello Mixed Media Mojo fans! Cathy here with another birthday with a balloon twist project! I am loving the new Oxides, I want to use them on everything and I kind of do!! LOL But I also still love my embossing powders and use them on so many things! Here is my newest project! Please check out the original post HERE and join in the fun!


Happy Birthday Balloons!


I started with a manilla tag and smooshed around my Distress Oxides to get nice colours for my balloons. I then embossed my Emerald Creek Charms with Charred Gold and Hammered Metal. I used a piece of paper from my stash and oxided it up!

I went over my balloons and my stash paper with the Crazing collage Medium, I seriously love this stuff!

Hammered Metal balloon

Charred Gold Balloon

Used my Small talk stickers to add to the birthday sign

Just look at the itty bitty crackly from the crazing medium!

I went over this crackle part with my Wilted Violet Distress Crayon and it just rubbed in so nicely!

On the edges of the balloons I rubbed a quick touch of Finnabair's new Opal Wax to give it some shimmer, it doesn't photograph so great but in person it's a gorgeous shimmer!
All of the wonderful supplies I used for this Oxidey birthday card!


Thanks so much everyone for stopping buy and don't forget to get your Birthday with a balloon twist entry in!! Can't wait to see all the projects you share with us!

Cathy

Monday, March 20, 2017

Mixed Media Tag Tutorial

Hi everyone, I'm Christina.

As most of you know I'm a Tim Holtz addict! One of the many products I have is the ever popular Sizzix die The Lost Zombie. I knew when I received this die that there would be high hopes for him. You can switch it up for any occasion.

For the March Challenge I decided to create a mixed media tag using The Lost Zombie die.


Meet Rusty. He's got big plans! Tracking through the twigs, with a present and balloons. It's a bit windy, but it's not stopping him form enjoying the celebration.


After dressing the zombie, apply distress ink Walnut Stain around the edges for a tattered look.


Apply a thin coat of gesso to a #8 manilla tag. Let it air dry. It doesn't take long because there's not a lot of gesso on the tag.


Now the fun part begins....using any color of distress crayon, I used (Abandoned Coral and Vintage Photo) start colouring in random areas on the tag and blend with your fingers till the tag is covered. Hint: if the color is too dark, you can always buff it out with a baby wipe. Next place stencil (Dot Fade) on top and apply texture paste over in random areas of tag. Let it air dry.


Apply distress ink Broken China on top of Dot Fade, to give a hint of color.


For the zombie's (aka - Rusty) accessories I used Stampers Anonymous CraZy ThiNgs and the coordinating sizzix Framelits die, then coloured with distress crayons in Abandoned Coral, Feathered Peacock and Mermaid Lagoon.


This is one of my favourite dies - Sizzix thinlits die Twisted. It was used for the grass. 


The saying - Eat More Cake - is from the Stampers Anonymous - Handwritten Sentiments. I really enjoy playing with this set, because of the expressive lines.


Notice the brush strokes from colouring - it gives an effect of woodgrain in the background. It's pretty cool right?!

I hope you enjoyed my tutorial and if you want further inspiration check out the other talented design team members projects on this blog.

We want to see your creations for the March challenge: Birthday with a Twist Balloons. So, grab your tea/coffee, supplies out and use your imagination. The possibilities are endless!

Christina


Wednesday, March 15, 2017

March Masculine Card

The March Challenge continues at Mixed Media Mojo and for my second project I went with a masculine birthday card.  The challenge runs to the end of the month and the theme is Birthdays with Balloons as the twist!  So let's get started!


I wanted to show a quick easy way to make a card for someone by using an embossing folder and dies.  Often times I overwhelm myself with over thinking a card, tag, mixed media project or art journal.  I liked the clean lines of this card and the two colors of silver and black.  It doesn't necessarily have to be given to a man and one could just change the background black card and it could be used for a woman's card as well.


To start all I did was a cut a piece of black cardstock (I used Bazzill card stock) and Tim Holtz Kraft Core silver paper into the size of an A7 card.


Then I took a Happy Birthday Embossing folder from Darice and ran the silver cardstock through my Vagabond 2 machine. I was going to leave the black card stock plain but decided I liked the embossing and ran the black through as well.


Since our challenge had a twist with balloons, I used my balloon die from Tim Holtz Crazy Things Die set and cut out 5 black balloons with strings from the Bazzill card stock.  Then I cut a thin strip of the black card stock and embossed it. I then placed it horizontally across the card along with another strip of silver card stock. I glued everything down with my tombow adhesive and voila!


This card was super easy to make and I like the clean lines and simplicity of the card.  A good technique that can be changed with different colored card stock.  I hope you enjoyed this fast and furious tutorial!  You can see more of my work on my blog-https://artsytartsyandsuch.blogspot.com/

Thanks for looking! Juli


Monday, March 13, 2017

Bring on the Celebrations - March Design Team Project


Hey everyone! I am back with my March Design Team post with this month's theme of Spring/Celebrations with the twist of balloons. I thought for this one what I would do is show you some video tutorials on how I made the birthday cards with the fun balloons I did for my design team project. I am new to doing videos so not sure how good my video is, but hopefully you can follow along and make some of your own balloons for your projects!

So, for the first part of my project - the Balloon Twist for this month - I wanted the balloons to pop and have a 3D feel to them. So here is a short video tutorial on how I made them. Please excuse the shadows in the video - as I said I am still learning and obviously have to get some better lighting in my craft room!


Then, for the background of the cards, I used the new Tim Holtz Distress Oxide Inks. I originally thought of doing a short video of this as well, but as you can hear in my video above I realized that there was no point doing this when Tim Holtz does a much better job if it than I would. So here is a link to the video that I used to do the backgrounds.

 
I ended up making several more cards using this technique and all the balloons that I made for my original project. Here are the cards I made - some with balloons and some without (using Tim Holtz's tutorial I ended up with a LOT of paper for card backgrounds). 


I hope you enjoy my tutorial and use it to make your own balloons and/or cards! And don't forget to enter this month's challenge!! 

Take care and have a very crafty day everyone!