Monday, April 24, 2017

Guest Designer Freddie

Welcome to our April guest designer post.  Let's welcome Freddie as our fabulous guest this month.  

She has put together a great tutorial using Tim Holtz products.


I started off by cutting the umbrella man from a mixed media tag by Ranger. 

As April showers are the main theme, I am overloading this tag with every rain drop I can think of. The drop stamps are from Designsbyryn, the white raindrop stencil is by Emerald Creek Crafts and the other one is from Crafter's Companion. And I am going to slap on the layers.

I scribble some distress stains on my craft mat to create the background on my tag. Tumbled glass and stormy sky are just perfect.

The "wrinkle free distress" or "smooshing" technique is my favourite one ever. It creates a unique background every single time. And you can layer as much as you want, until the desired effect.

With a darker blue, chipped sapphire distress ink, I added the next layer on the tag. Small raindrops through the stencil. 

The next layer will be stamped raindrops with distress oxide. As the oxides are semi opaque, this lighter color will lay on top of the darker background. 

To create dimension, I decided to stamp larger drops in another lighter oxide. 

To make the drops more dimensional and realistic, I always add some highlights on them with a white gelli roll pen.

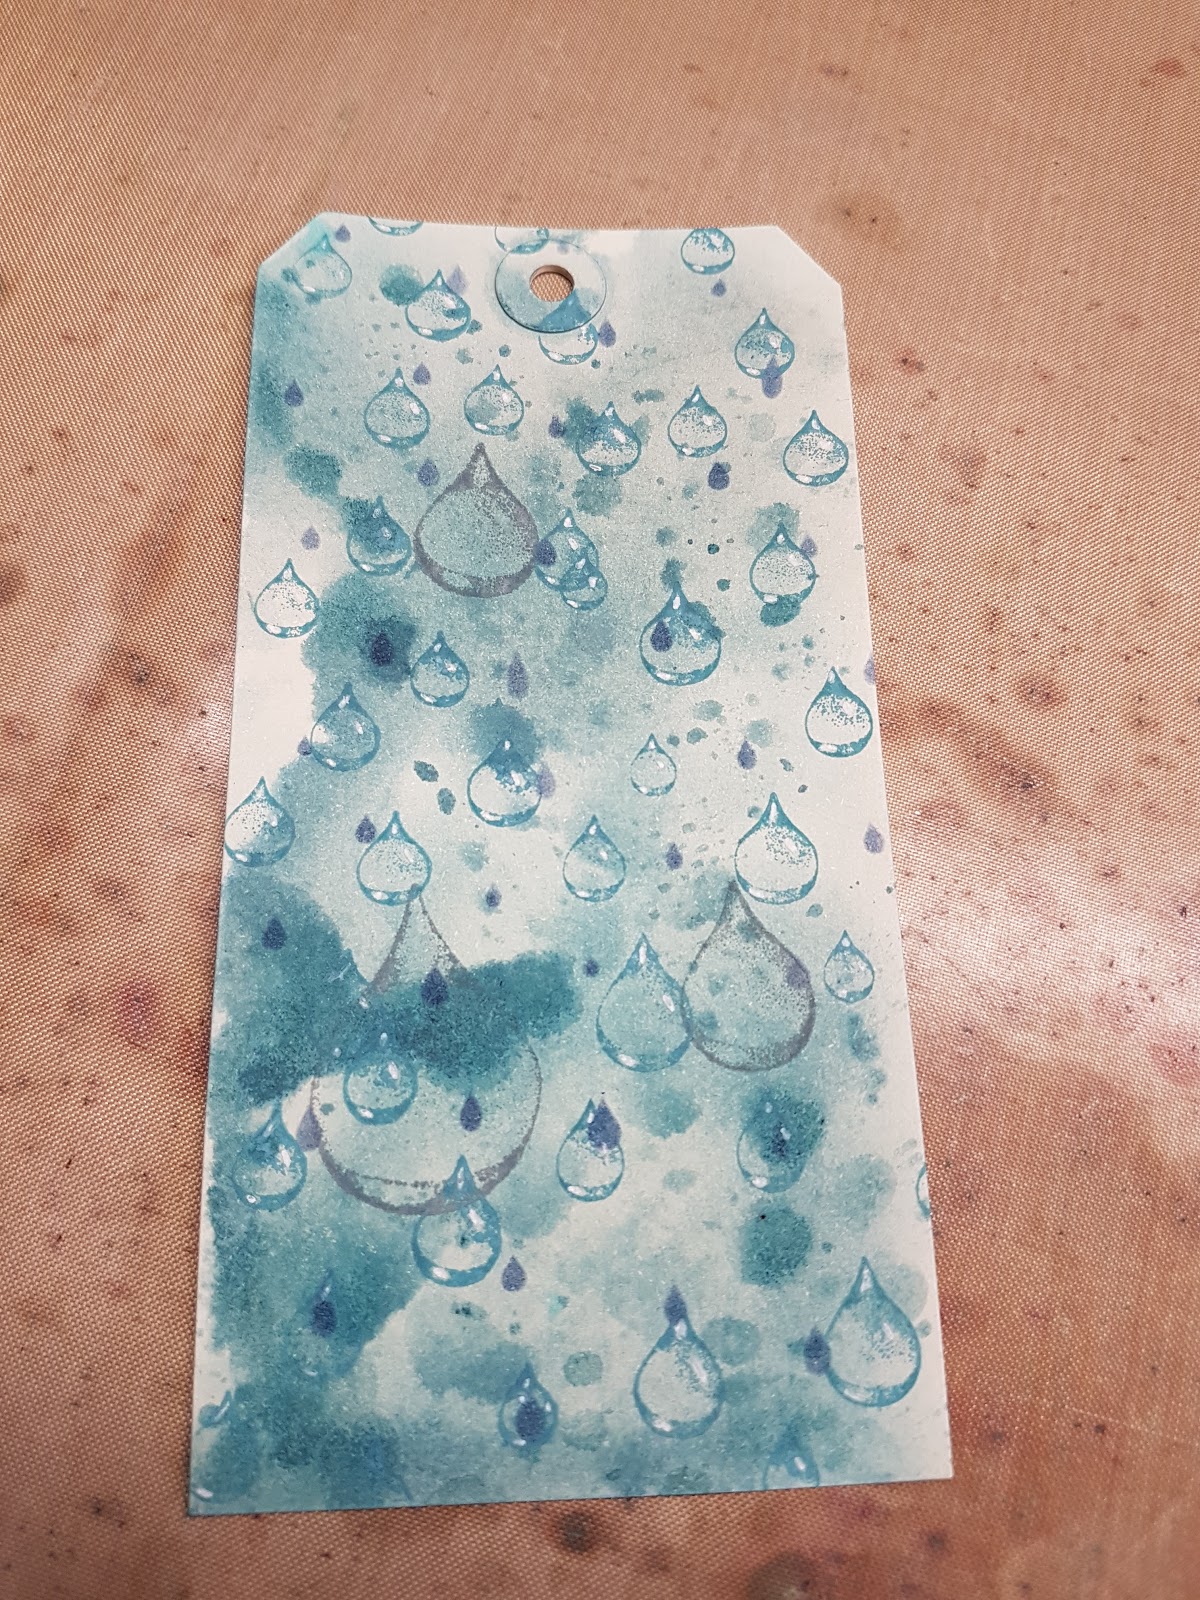
Here you see the difference between the smaller drops that have been highlighted, and the big ones, that haven't been done yet.

Still layering it up! I used Dreamweaver translucent embossing paste to create more raindrops with the second stencil. 

The paste is whitish to begin with, but it dries completely clear and shiny.

As the background dries, it is time for the umbrella man to get some life inked onto him. So I smooshed down some oxides onto my craft mat and sprayed it with water. Let the birth of Umbrella man begin!

I just loooooove how the oxides layer on top of eachother and how they react with water. He is ready for his next layer...

This crazing collage medium is a must have if you like a vintage look on things. It is AWESOME.....

Once the crazing is all dry, it is time to make sure they pop on the umbella man. So time for the crayons to make an appearance. I scribble some dark ground espresso distress crayon on my craft mat and spritz a little water on it and rub it all over my man. The crayon will go into the crazes and will make them more visible and give it a vintage look.

See what I mean? I am crazy about the crazing hahaha. 

I am going to add this word band to the tag. I highlighted the letters by rubbing white distress crayon over it and working it really well into the crevices.

To finish off the word band, I used two plain brads that I customised using one of my specialty embossing powders by Emerald Creek Craft, called Northern Lights. It is the most gorgeous mix of blue. 

As many of my crafty friends know, I always put fluffy bows on top of my tags. I am addicted to crinkle ribbon and stain it to match my projects. It takes distress inks and stains like nothing else. 

When it rains, your umbrella gets wet..... so I added a few droplets of Glossy Accents to emulate rain drops.


And voilĂ , the tag is all done. I inked the edges with walnut stain distress ink as it was a tad too blue and cold. This warmed it up a bit.  Thank you so much for taking the time to step by. 

Take care and keep your craft on!

Freddie
xxx

Wednesday, April 19, 2017

RAINDROPS KEEP FALLING ON MY HEAD


Hey everyone! Monica here and this is my April design team post. I hope you are all having a fun month cause I know I am! I wanted to show you how I used another of my new products - the Dina Wakely Scribble Sticks. I watched a couple videos on how to use them and came up with some fun projects for them.

First off, with the theme Spring and the twist Showers I wanted to create a journal page using my new Dina Wakely Scribble sticks. This is the page I came up with.


As I said, I had watched several videos on this new product, but this is the one I followed for this page.


But then I decided that I don't want to always show you other people's videos. I need to make some of my own. I apologize in advance that it is not as good quality as the video above. I am still learning how to improve my videos, but I hope you still get the idea. I made a couple of Easter tags for the gift baskets I am sending my grandsons. Take a look at how I made them.


And here is a picture of the finished tags.


So I hope you liked my little tutorial and my projects for this month. And make sure you enter the April Challenge!

Take care and have a very crafty day everyone!

Friday, April 14, 2017

Springtime Skelly Flowers

So for the April Challenge at Mixed Media Mojo, the theme was Spring with Umbrellas as the twist! I am a lover of all things Halloween and had some Dyan Reavley skull stamps that were just calling out to be used! So what better way to use them but in a garden with some spring showers!  So let's get started!

I started with a #10 tag and the new Tim Holtz Distress Oxide inks! I love how they look and I used Spiced Marmalade, Worn Lipstick, Broken China, Cracked Pistachio and Fossilized Amber.  Then I took a stencil and made some swirls and dots over the colors. A light mist of water helped to activate the oxides.

It took my Dyan Reavley stamps and used the flowers and skulls to stamp images onto the tag. I used the umbrella from the Tim Holtz Umbrella Man. A little trick, you can mask off parts of a stamp so that they don't get ink on them. I stamped in Distress Archival Black Soot Ink.


I then added the rain drops with  a rain drop stamp from Deep Red Rubber Stamp! The tag was finished with Distress Black Soot ink around the edges and Voila! Skelly Flowers in the rain! Happy Easter!


You can see more of my work at https://artsytartsyandsuch.blogspot.com/.

Make sure to join in the fun for this month's challenge!


Juli

Wednesday, April 12, 2017

Springtime is Flower Time

Happy Wednesday everyone! Cathy here with a new Spring project to share with you. I love the flowers blooming part of Spring the best! I don't have a garden so I have to make mine out of paper or buy them at the store and I'm okay with that! :)
Please make sure to join in the fun and link your Spring with a Shower twist project to the original post found HERE

So for this project I wanted to try something new, so I did a reverse canvas! Loved it and now have a new way to use things I have in my stash!


My Springtime reverse canvas


I used my Eileen Hull flower die to cut out numerous flowers. I then "oxided" them in Broken China and Wilted Violet. I then embossed Emerald Creek Daisy Brads with the new Salted Raven Enamel EP from Emerald Creek. I used the ecQuarry stones for some of the flower centers as well.
 
 
I used lavendar tissue paper and TH distress collage medium to put it on my canvas. Once that was dried I ran some TH tissue tape around the sides. I then mixed some Finnabair paint (so shimmery!!) with Ranger Texture paste and added that on the sides of my canvas using the two TH stencils.
  
And now for some close ups :) 

Some shimmery Dylusions Mica Sprays to add some more colour

Th wildflower stencil and I didn't forget my twist, it's just hard to see! i added little raindrops around my frame with Glossy accents and some glitter, very sublte but they are there.

I used super tall pop up squares to get some height on my center piece and I love how it makes the charms cast a shadow on the background.

Added some ecQuarry Amethyst stones around my border

More ecQuarry stones in the center of the flower and look at all that oxidey goodness! :)

An Emerald Creek brad embossed with the Salted Raven Enamel EP

More ecQuarry stones for the flower center, they were the perfect finisher for these Eileen Hull oxided flowers!

And the center piece is a wonderful card from the Wild Whisper Rooted Love collection. I just fussy cut it out, then painted the tiny x's in purple so they matched my flowers. On the TH charms I ran some of the new Finnabair wax over them to give them some colour.  

Thank you so much for stopping by today and I hope you are ready to join in and share your spring/shower creation with us!
Have a wonderful Wednesday everyone!


Cathy

Monday, April 10, 2017

Welcome to the OxSide

Hi everyone, I'm Christina.

Once I had an art instructor at college tell me that I should incorporate my fears into my art, because it gave it character and brought out my true self. The assignment was to interpret a Chagall painting - it was a circus. One of my many fears....clowns etc. I created a piece with my fears to make it my own. I received an A-

I remember that day, and I think I still have my art piece, in the basement.

So now, onto the good stuff.....!!!
As promised I'm doing a tutorial on my mixed media tag I created for this months challenge: April - Spring with a twist Showers.


As most of you know, Tim Holtz has come out with a very exciting product, Distress Oxides. This type of distress is a lot of fun to play with and I'm going to show you how awesome the colours work!


First I took a #8 Kraft tag and tapped it over the distress oxides, Vintage Photo and Faded Jeans (already spritzed with water) then heat set. I repeated this step till I got the coverage I wanted. Hint: to prevent the colours turning into mud, heat set after each application.


Next apply Ranger texture paste - Transparent over Tim Holtz stencil - Splatters with a palette knife, let it air dry. This gives the illusion of rain droplets/showers.


Randomly stamp images using Ranger Black archival ink on top of tag. I used Wendi Venchi Art for You stamp set, honeycomb.


Distress Oxide Vintage Photo and Faded Jeans were used to watercolour the butterfly on TH mixed media #8 tag. This surface sturdy and holds the color for a nice deep effect.


To make Tim Holtz Salvage doll less "creepy", I painted her with an alcohol ink mixative in gold, to give her a more angelic vibe. For those of you that don't know, I have a doll phobia. So it was a little challenging for me to add her. But I'm glad I did, as she is the focal point of this piece.


Did you know that you can oxide TH crinkle ribbon?? Just swipe the oxides on your craft sheet, make sure they don't overlap, spritz them and scrunch the ribbon till it's covered and heat set it. It's pretty cool to see the colors layering on top instead of blending.


Next I grabbed one of my hubby's spare guitar parts (a spring) and covered it with black gesso. Any kind will do. To speed up the drying process, heat set it.


This is the fun part.....! Be prepared to get messy, using your finger smudge various colors of beeswax over the spring to your desired taste. I used Art (c) beeswax in copper and Viva Decor Inka Gold in steel blue. Then sand it down so it's not as vibrant.


Here you can see the effect of the beeswax and how vintage the spring looks.


Attach everything in place and let it set. For the metal spring and "angelic" doll I used a very sturdy glue called E 6000. You can buy it at any local craft store. Mine was from Michaels in the floral section with the other glues.

I do hope you enjoyed my tutorial and if you're feeling inspired,  join in the fun in our April challenge: Spring with a twist Showers. We want to see what you create!!

Christina