Hello Guys!
This is our first post for Mixed Media Mojo. Here's a little something about us before we begin sharing our project.
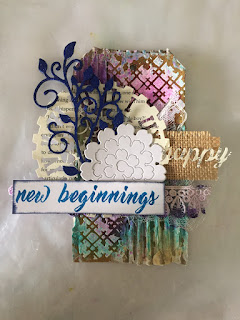
Today, we’ve created a mixed media tag on the theme of the January Challenge- New with the twist clocks.
This is our first post for Mixed Media Mojo. Here's a little something about us before we begin sharing our project.
My mom Sunila and I Aditi , started Dots to Lines and our forte is home decor, mixed media, scrapbooking and altered art. Sunila has a diploma in commercial art, and displays her artworks in various galleries across the world. She has also worked as a Graphic Designer at Hameed Mugal, Kenya. With a MSc. in Clinical Psychology and Dip. in Special Education,I took up arts and crafts since school days and also practiced art therapy when working with children with special needs. I have also completed an art course from School of Visual Arts, New York.
Crafting, thus has been a part of daily activities mostly in the form of various altered projects, or making gifts. We are into paper-crafting, layouts, journaling, card-making and scrapbooking. Our style of art and craft is a fusion of techniques and usage of vibrant colours. We aim to spread joy.
Today, we’ve created a mixed media tag on the theme of the January Challenge- New with the twist clocks.

Sit back and enjoy:)!
Supply List-
Corrugated sheet (from leftover packaging),
Sizzix- Tag Die
Prima- Vintage Clock Die, die cut on old book paper
Cheerylynn Designs- Flourish 8, die cut on blue glitter foam
Its Bitsy- Swirly Hydrangea, die cut on white cardstock
Peek-a-boo-designs-Happy doe, die cut on old book paper
Mudra- Geo pattern stencil
Prima Art Basics- White Crackle paste
Gauge/Cheese Cloth
Lindy’s Stampgang Sprays- Marigold Yellow Orange, Sassy Sapphire, Prima Donna Purple, Hi Maintenance Magenta, Plumeria Pink, Ocean Breeze Blue
Lace
Flowers
Glue
Jute piece
Ribbon Distress Ink- Chipped Sapphire- To distress our sentiment.
What cardstock.
Step 1:
Die cut the corrugated sheet and a piece of white cardstock with the tag die. Begin scrapping off paper from the corrugated sheet at places.
Step 2:
Apply white crackle paste through a stencil to add textures and dry.

Step 3:
In the remaining spots apply white heavy gesso randomly covering the brown.

Step 4:
Start playing with colours. Add randomly and stop when you feel good :)!
Step 5:
Assemble all the die cut elements, gauge, jute piece, lace and sentiment and stick them when you’re happy.
Step 6:
Add some flowers! Mount it on the white cardstock tag and tie some ribbons to complete your tag!
Hope you enjoyed this tutorial. We have a video for the same.
Looking forward to your projects for the challenge!


No comments:
Post a Comment