Showing posts with label mixed media tutorial. Show all posts

Wednesday, May 10, 2017

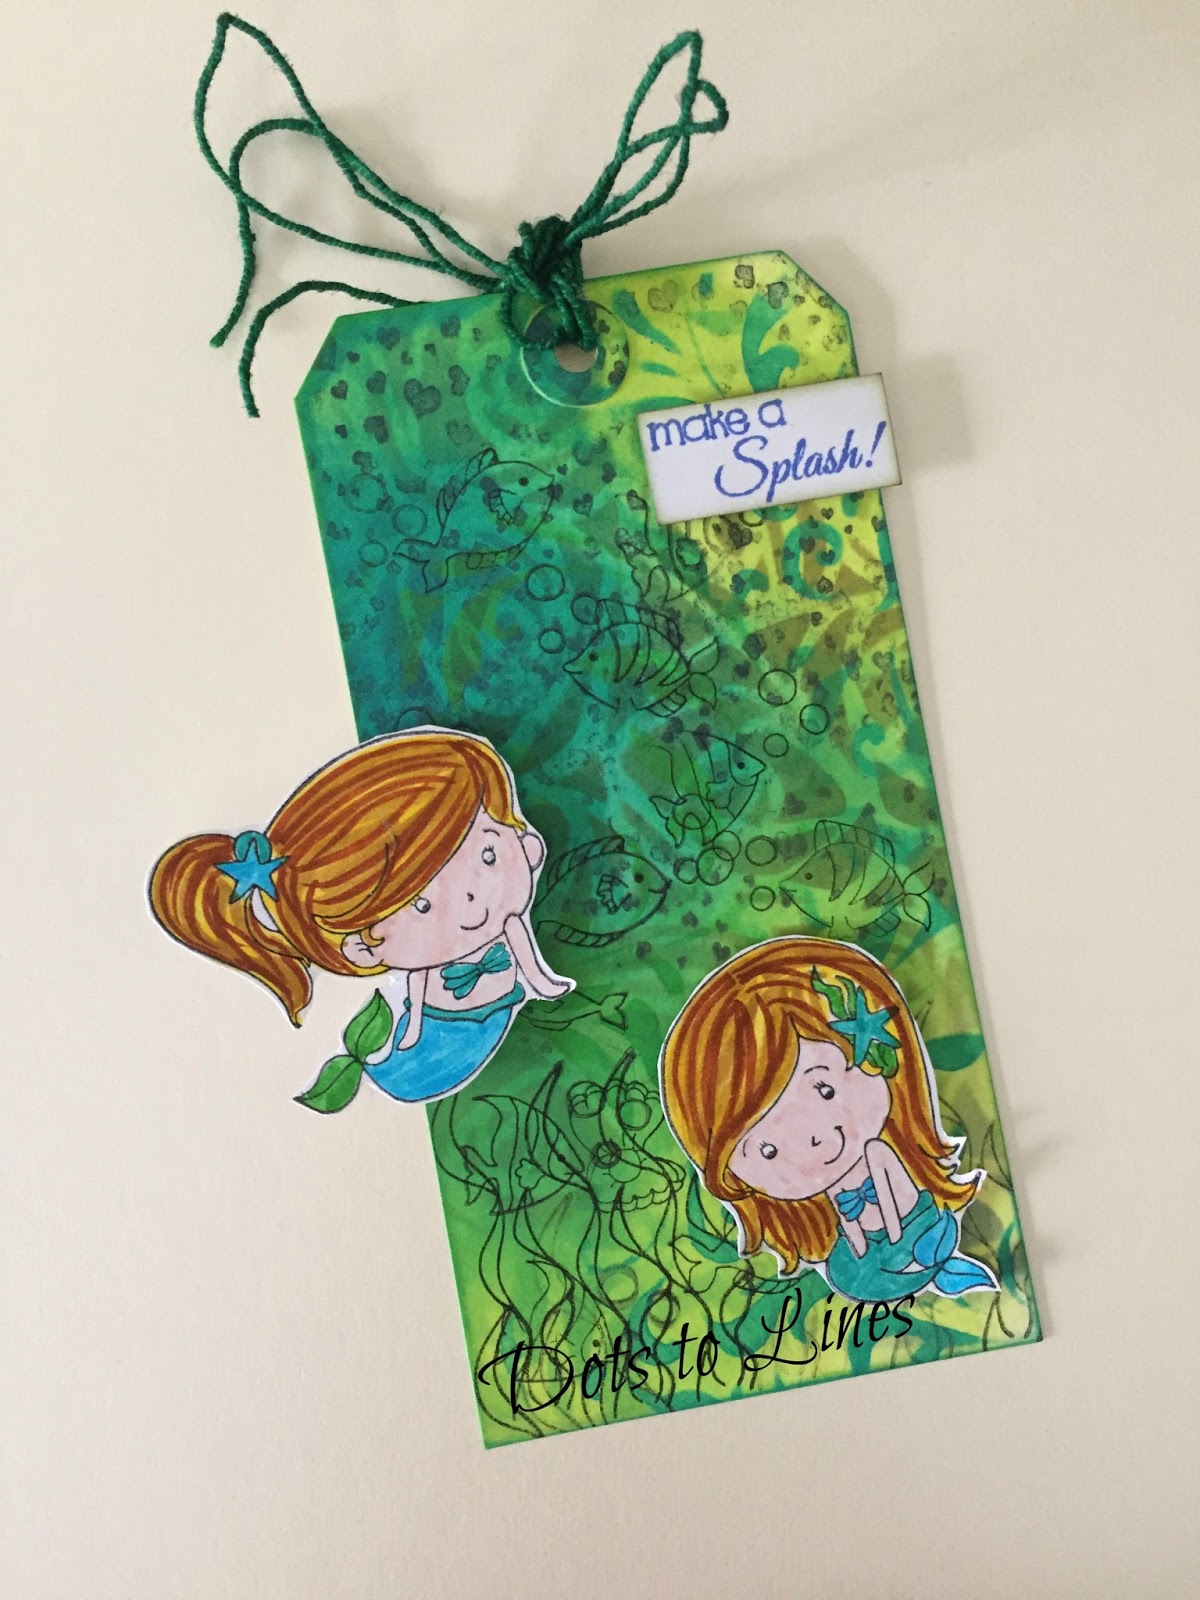
Tag tutorial

Hello everyone,

We're back today with an easy to make tag tutorial for you'll.

Before that did you check the ongoing challenge? Do check it out here.


Onto our tutorial now:

Supplies:

  • Manila Tag
  • Jet Black Archival Ink
  • Craftyscrappers- Raining Hearts and Mermaid Wishes
  • Dylusions- Fresh Lime, Vibrant Turquoise, Calypso Teal, Cut Grass
  • Tim Holtz Stencil- Flourish and Scribbles
  • Distress Ink- Peacock Feathers, Blueprint Sketch, Forest Moss
  • Zig markers


Step 1: Stamp using a background stamp and black archival ink onto your tag.


Step 2: Using Dylusions add colour on the tag, blending some shades on the tag.


Step 3: Use a stencil and stencil with Dylusions on the background


Step 4: Using distress inks and another stencil, add some more texture on the tag.

Step 5: Using a focal element stamp set, stamp on the background. Stamp focal elements on separate paper, colour and cut them. Then arrange them on the tag.


Add string/cord and your tag in complete!


Hope you're inspired to create and do participate in the ongoing challenge!
Regards,
Sunila & Aditi


Monday, November 14, 2016

Turn Turn Turn Art Journal Page

Hello everyone, thank you for stopping by!  Deb here today and since it is Monday that means it's time for a new art journal page.  I made my Turn Turn Turn art journal page to incorporate some of the metallic leaves I didn't use on my first project this month for our Autumn with the twist of Metallics challenge.


I've a few step out photos on how I made it, enjoy!

I started out with a single page from my art journal (which I have had to take apart since it was getting to thick to close, I can't stop adding embellishments!).  I stamped the page with Tim Holtz's new Pine background stamp and Tree Branch Archival ink and then coloured the page with Antique Linen and Frayed Burlap Distress stain.


The word TURN was stamped several times on the page with Ground Espresso Archival ink and I then spattered the whole page with diluted white, orange and brown acrylic paints.

I die cut the Bird Branch die from some crackled cardstock I had in my stash from another project.  I cut the bird off and saved him for a rainy day!


The branch was a little too pale for my design so I coloured it first with Ground Espresso Distress stain and then intensified the colours here and there with Walnut Stain and Vintage Photo Distress crayons.

The Weathered Clock was die cut from some chipboard packaging and embossed with Burnt Copper Leaves embossing powder.  Love this embossing powder!


And then the page was assembled.  I made a tag by painting a piece of cardstock with Frayed Burlap Distress paint and then running it through my printer to print the sentiment (the font is called Beyond Wonderland).


The tag shape was cut out and some oak leaves were punched from a remnant of Distress ink coloured cardstock with a couple of Recollections punches.  The edges of the tag were edged with some gold Decofoil.

The leaves are Ranger Foil tape mounted onto cardstock, die cut with the Layered Leaf


and Arbor dies and then coloured with alcohol inks.


Here's a close up of the Pine background and spatters, such an easy way to get some texture and interest on your background.


I hope that you've enjoyed seeing my Turn Turn Turn art journal page, I really enjoyed making it and was humming The Byrds song the entire time I was putting it together.


You still have plenty of time to enter our November challenge so hope you will head into your craft space and make something to link up.  I can't wait to see it, happy creating!

Deb xo

Wednesday, October 12, 2016

The Bat Sitter Mixed Media Canvas

Hello, Deb here to welcome you back to another Mixed Media Wednesday here at Mixed Media Mojo.  Today I have a Halloween canvas to share with you for our current challenge, Spookiness with the twist of adding Bats.


I'd like you to meet Zebediah Zombie, he's currently bat sitting for his friend Vladula Von Peckering who is away visiting his cousins and here you can see Zebediah taking Vlad's bats for a walk (or is that a fly?!)


I had so much fun making this, grab a goblet of potion and read on to see how I put it together!

I started out by cutting Tim Holtz's Lost Zombie and Gothic Gate from manila cardstock.

I then cut the zombie 3 more times from some packaging and cut one of them apart to layer together for some dimension.

The manila zombie was coloured with Distress inks and cut apart so I could add the clothes to the layered zombie.


I coloured the layered zombie with Old Paper Distress paint before adding the clothes and added Distress Crackle paint to give a lovely zombie-like skin texture to Zebediah.

The Gothic Gate was embossed with black embossing powder and then I sprinkled on bronze, silver and a green embossing powders here and there for an aged patina.  I ended up die cutting another gate and embossing it in the same way to form a fence.

A 1 1/2" circle was stenciled onto a 6" x 8" flat artists canvas with various colours of yellow Distress inks and then the circle was stenciled again with the Speckles layering stencil and Hickory Smoke DI to make the moon.

The stenciled moon was masked off and the entire canvas coloured with various shades of blue and purple DI for the sky and shades of brown for the ground.


The colours were intensified with Distress crayons and then some creepy vines were stenciled along the bottom with the Twisted mini layering stencil and Ground Espresso DI.

Ground walnut shells were mixed with Transparent texture medium and applied along the bottom with a palette knife.  A couple of the 'extra' zombie bits were adhered underneath the shells :O)


The haunted house from Tim Holtz's Mini Halloween #5 was stamped onto manila cardstock, fussy cut and adhered to the canvas.  The house was shaded around the edges with Black Soot Distress marker.

The Gothic Gate was cut in half and one hinge on each side snipped so that the gates looked like they were broken and falling down.  The second gate was cut down and adhered to each side to form the fence. A couple of tombstone images found on the internet were fussy cut and adhered to the canvas along with 1/2 of a Tim Holtz Pumpkin Piece and a couple of his Boneyard bones.


I had one of these bats that a friend had sent me (it's a die cut but not sure who makes it, sorry) and used the one bat as a pattern to cut a couple more of varying sizes from black cardstock.  I adhered each of the bats to some thin rusted wire and twisted all three together.

The zombie was mounted onto some black fun foam for dimension and the bats positioned so he was holding their 'leashes' in his hand.  Here are a few closeups of the finished canvas.


Thanks so much for stopping by today and I hope that you have enjoyed seeing my bat sitting zombie Halloween canvas!


Hope you have been inspired to join in our October challenge, can't wait to see what you link up,  Happy creating!

Deb xo

Wednesday, August 17, 2016

Fruits Of Our Labours Mixed Media Canvas

Hello and welcome, Deb here today for Mixed Media Wednesday to share a project with you that was inspired by our August challenge, Harvest with the twist of adding Fruit.


I have a quick tutorial on how I made my 'Fruits Of Our Labours' mixed media canvas, hope you will enjoy it.

I started out with a 5" x 7" flat artists canvas and added die cut letters to spell out my words.  I have A LOT of die cut letters from previous projects that I hoard keep in my stash so I used them and didn't worry about what material or colour they'd been die cut from as I intended to cover everything with gesso.  I layered three of each letter together for some dimension and adhered them to the canvas.


The wide serif letters are from Tim Holtz's Boardwalk die and the narrow sans serif letters are from his Alphanumeric dies.  I gave the whole canvas a coat of gesso and let it dry.

Sprays and drips with Distress spray stain in shades of yellow and orange came next along with some spritzes of water to blend the colours.


After the stain had dried, I sealed the whole canvas with Distress Matte collage medium and then intensified the colours by scribbling with Distress crayons and blending with my fingers.  I added some shading to the lettering with shades of brown Distress crayons and then gave each letter a dusting of Perfect Pearls.  The edges of the canvas were also shaded with brown Distress crayons.

Stamping came next, I used a variety of script and mixed media stamps from my stash and stamped them onto the canvas with Black Soot Distress Archival ink.


I still felt I needed some interest on my background so spattered the canvas with white and then black thinned acrylic paint, masking off the lettering before doing so.  Here's a close up picture of the spattered and stamped background.


I then fussy cut some vintage peach and apple images from my stash (courtesy of Magic Moonlit Studio) and adhered some of them to the background.  I sealed the background images with Distress Matte collage medium and then used a Black Soot Distress marker to add some shading.


The two foreground images were mounted onto black fun foam and adhered over top to add a bit more dimension to my canvas.


I love the addition of the Perfect Pearls to the lettering, I must remember to use it more often!


Hope you have enjoyed my quick little tutorial, this is a great way to make use of those hoarded surplus die cut letters you have in your stash!


I also hope it has inspired you to join in our August challenge, I can't wait to see what you create.


Thanks again for stopping by today and happy creating!

Deb xo

Wednesday, June 8, 2016

Queen Of Our Hearts Mixed Media Plaque

Hello and welcome!  Deb here for Mixed Media Wednesday at Mixed Media Mojo and today I have a tutorial for you on how I made this 'Queen Of Our Hearts' mixed media plaque.


In keeping with our June challenge theme of Fit For A Queen with the twist of adding Gems or Jewels, I made this mixed media plaque to gift to my sister-in-law for her birthday.  Read on to see how I made it.

I started out with a chipboard Automaton doll that I purchased at Paper Whimsy, she seemed sufficiently regal for the theme!  I painted the body and arms with quite gesso first,


and then painted her hands and face with Ceramcoat AC Flesh and her body and arms with Americana Avocado Dip acrylic paints.

I then stamped her arms and body with a script stamp and Jet Black Archival ink and heat embossed the stamping with fine line black embossing powder.


I resized and printed out one of the Beautiful Faces (sheet 326) from Paper Whimsy and glued it to the Automaton's head, trimming and sanding the edges of the face once the glue had dried.

Since every Queen needs a crown, I took a chipboard crown that I purchased at Michael's and gave it a coat of gold embossing powder.


Some Jambo Lace Tape was used to embellish the Queen's collar and cuffs and a flat back heart gem from my stash was chosen to cradle in her hands.

I further embellished the crown with a red flat back gem and a line of midnight blue embossing powder and adhered it to her head.


A small chipboard fishtail banner was painted with black acrylic paint, the sentiment 'Queen Of Our Hearts' was printed out on the computer and cut to size and glued onto the painted banner.

For the plaque backing, a piece of heavy chipboard packaging was cut 5 1/2" square and two Maya Road flourishes were adhered to it.  The entire piece was then given a coat of white gesso.


I then dripped, painted and smooshed various colours of Distress stains onto the gesso painted surface (Old Paper, Iced Spruce and Peeled Paint), diluting the stains with water and letting them drip and pool.

After drying the surface thoroughly, I then stenciled texture paste through Tim Holtz's Rays Layering stencil and while the texture paste was still wet, sprinkled on more of the gold embossing powder (click here to see Tim Holtz's tutorial on this technique).  After the texture paste had dried, I heat embossed the embossing powder and intensified the colours on the plaque with Distress crayons in Mustard Seed, Peeled Paint and Twisted Citron and added shadows and contrast with Vintage Photo and Walnut Stain.


My apologies as this is where I got on a roll and forgot to take any more in process pictures!  You can see the embossed rays in the photo above and I also ended up adding some small gold stars (star confetti from the Dollar Store) scattered here and there over the plaque.

The Queen was adhered to the chipboard background and the flat back heart gem was nestled in her hands.  Her head was surrounded with some flat back pearls after she had been adhered into place on the chipboard background.


The flourishes were given a coat of Distress Crazing collage medium and the tiny cracks were highlighted with some Vintage Photo Distress crayon.  I further enhanced the flourishes with an outline of Moss Green Distress marker that I softened with a water brush.

So that is my Queen Of Hearts mixed media plaque tutorial, I do hope that you have enjoyed it.


I also hope that you have been inspired to join in our June challenge, Fit For A Queen,


I can't wait to see what you make!  Happy creating,

Deb xo